Wednesday, March 19, 2014

All About The Brows!! Product Reviews and All The Products I Use!!! ;)

In my humble opinion, the eyebrows are the most important feature on a woman's face. It can make you or break you. Eyebrows not only shape your face, but it brings out certain features like your eyes, your lips and your cheekbones. Trust me, you always want your eyebrows to be on point, regardless of a good makeup day or a bad makeup day :) I am going to now share and review all of my favorite brow products with you in the order that I put them on when I do my brows:

1. Step 1: The Anastasia Beverly Hills Beauty Express Powder Palette in Brunette:
This palette is absolutely amazing. It includes an eyebrow wax to keep the brows in check and the brow powders in a lighter and darker brunette shade (I use the darker shade). And it comes with a lovely highlighter powder for below the brow bone. I have been using this product for 3 years now and I don't intend on stopping! The brown color is perfect for most brunettes its dark enough to make a statement but not too dark that it does not look natural. When I do my brows I start with this powder first. I carve out the perfect shape with this powder and I use the Anastasia #15 brush. Once I finish shaping my brows with this powder, I move onto my next product...

2. Step 2: The Anastasia Dipbrow Pomade in Dark Brown:
Every woman should add this to her beauty collection. This product makes your eyebrows look perfect. It's a dark brown cream that you apply to your brows using a brush like the #15 brush from Anastasia. Once you let it completely dry it will make your brows waterproof; so you can go to sleep and wake up the next morning and your brows will be in place :) This will make your face look stunning because you need eyebrows to break up the monotony in your face and this will do it, since it intensifies the brow! I love this product, it really gives your eyebrow the "done" look. If you are not a fan of this product here is a great alternative for you, which I also use as well:

3. Step 3: Makeup Forever Aqua Brow in 30 (My Alternative Product to Dipbrow):
This is also a great product! I was using this for a while before I discovered the Dipbrow, right now the Anastasia Dipbrow is my number one favorite but this comes in at second. I love this stuff, it is also an eyebrow cream that comes in a thicker consistency from a tube. It dries much darker on the brows. This is also waterproof and I wore this in Hawaii on my Honeymoon and it held up pretty well. The only complaint I have is this tends to be a little more clumpy than the Dipbrow. Once I finish applying one of these eyebrow creams to my brows, I finish it off with some mascara: 

4. Step 4: Maybelline Great Lash Mascara in Black:
I am sure many of you are thinking "Mascara for the brows??" Don't worry, I have a method to my madness; since the brow creams on the eyebrow can sometimes make your brow look all one color or a little "flat" looking, you want to bring those brow hairs back to life with a little touch a mascara. This mascara should be a shade darker than the brow cream. This will make your brows look more natural and separated opposed to being all one color. 

There you have it! My Brow Routine! I hope you enjoyed reading this post and I hope you all learned something new. Thank you so much for reading :) Feel free to comment or e-mail me any questions! XOXOXOX


Tuesday, March 18, 2014

How to Get That Perfect Model Tan Without Laying In The Sun!!! (A List Of MY HOLY GRAIL Self Tanning Products)

Spring time is just about here, and I am sure most of you cannot wait to throw on those flirty little sun dresses!! You can kiss those pasty winter legs good bye, and say hello to sexy tan skin after reading my self tanning secrets! When it comes to self-tanning, I am a Pro! I have tried every self tanning product under the sun (literally). I've been orange, I've been streaky and I've even had those orange palms! Self tanning has been a part of my beauty routine since I was 15 years old and through many trials and tribulations I have finally perfected it. Being a model, has pushed me to find the perfect formulas and I know I finally have! I will let you in on what I feel are the highest quality self tanning products that actually deliver stunning results!

1. MY #1 FAVORITE SELF TANNER: Vita Liberata Tinted Self Tanning Lotion in Rich and Extra Rich:
This Self Tanner is truly amazing! It does not streak and it is super easy to blend into the skin. It gets me very dark, but its a beautiful golden dark....not a muddy green dark. The smell is very faint, hardly any smell at all. I would give this tanner a 10/10. It will get you dark!!!

2. My #2 Favorite Self Tanner: Bare Minerals Faux Tan
Although, I do not love this tanner as much as the Vita Liberata, It still does get me pretty dark. It also is not streaky and is pretty easy to blend into the skin. The main thing that I am not a fan of is the smell. Its not terrible but it is also not too faint. I would say this is a great back up self tanner! I give it an 8/10. It is still a solid product :) 

3. My #3 Favorite Self Tanner: Fake Bake Self Tanning Spray
I used to wear this self tanner all the time, but since it is a spray I was concerned about breathing in all of these chemicals. I wanted a safer alternative, so I switched to a lotion. But I still will say this self tanner is excellent. I would suggest spraying this in an open room or outdoors in a private area. This self tanner is also streak-free, smells kinda good...like chocolate and gets you very dark. But I hate the fact that it is a spray self tanner, so I will rate this a 7.5/10. 

4. My #4 Favorite Self Tanner: Tarte Brazilliance Self Tanner
This is a great self tanner if you are looking for a nice glow, not a super dark tan. It is SUPER blend-able and and soaks into the skin nicely. There is hardly any smell at all and it really moisturizes the skin. I love using this whenever I feel like just having a nice healthy glow. I will give this a 7/10.

Ok as of right now, these are my favorite self tanners, but now I will show you my favorite products when you forget to put on your self tanner! Life is unpredictable, and to be honest applying self tanner takes a little planning ahead. Most self-tanners take anywhere from 4-8 hours to fully develop, so you usually have to apply it the night before. The following products have been a life saver for me when I have to go to an event last minute and I am white as a ghost! Here they are: 

1. My #1 Favorite Instant Bronzing Product (Not self Tanner): Makeup Forever Body Tan in Medium and Dark
I am obsessed with this product! It gets you super dark like a self tanner would! It dries instantly and does not come off until you shower the next morning. It is perfect for a night out in your little short dress! It blends so easily and there are no streaks. Make sure you wear some clear latex gloves when applying this product! When you first apply it into the skin it looks really red, but do not worry, it blends out to a golden tan. For a tanning quick fix I would rate this product 10/10 :) 

2. My #2 Favorite Instant Bronzing Product (Not self tanner): Sally Hansen Airbrush Legs Lotion in Deep 
You would not believe how many models wear this product for shoots and for the runway. This is a leg makeup but I buy it in the color deep, so I can use it as a quick tanning fix :) It will cover any imperfections on your legs, arms, tummy and make you look totally airbrushed. I would not use this product for every day use, but it is great for a special occasion or a night out. Make sure before getting dressed after applying this product to take some dry paper towels and lightly wipe down your skin to get any excess body makeup off. I think this stuff is great in winter; during summer it can feel a little heavier on the skin and you may run the risk of it sweating off of the back of your thighs if you are sitting in a warm room. Overall I would rate this product a 8/10.

If you are looking to get that Sexy Glow that J-Lo always has, then you need a great shimmer product to put over your new tan :) These are some of my fave body shimmer products:
Above Photo Left to Right: Hard Candy Glow, Body Bling by Scott Barnes, Gleam by Melanie Mills

SELF-TANNING TIPS:
Last but not least here are my tips on making your self tan look it's best:

1. EXFOLIATE: Removing dead skin will make sure you won't have any streaks or patchiness. I love to exfoliate with Fresh Brown Sugar Body Polish:
This product makes my skin so soft, I use it in the shower and after rinsing, my skin feels brand new! You do not need to moisturize after using this product.

2. Wear Gloves!!: Always wear gloves when you are self tanning to prevent dark palms. And make sure the gloves are your right size and not too big and baggy (this will create streaks). I love using the latex gloves from Sally's Beauty Supply store.

3. Moisturize: Before tanning, always apply a small amount of lotion to your ankles, back of your heals, your elbows and your knees.

This is Everything you Need to Know About Self-Tanning! Please Comment below with any questions or feel free to e-mail me. Thank you so much!! :) XOXOX


Sunday, March 16, 2014

Cute St.Paddy's Day Outfit Ideas! (Daytime & Evening)

Above: Daytime and Evening look
Hair: curled with 32mm Nume Magic Curling Wand
Daytime Look
Top: Thrift Shop (Approx. $10.00)
Jean Shorts: Planet Funk
Leather Belt: Ruehl No.925 .
Leather Boots: LoveD

Evening Look:
Top: Vintage 1950s (Approx. $20.00)
Skirt: Love Story
Bag: Chanel
Earrings: Amazon.com
China Glaze Nail Polish in Grass Is Lime Greener :)

Ps. I will soon make a post about shopping at swap meets and thrift-shops. These are some of my favorite places to find rare, unique gems. I will give you the 101 on second hand shopping ;)

Thank You All so much for your Love and Support :)
HAPPY ST. PATRICK'S DAY EVERYONE!!!!


Friday, March 14, 2014

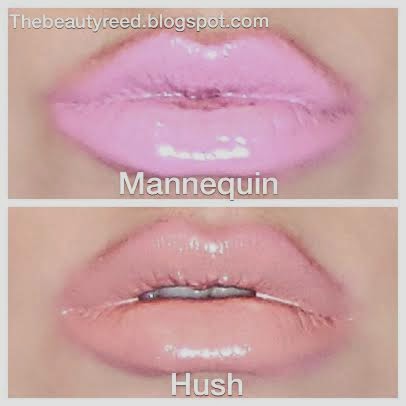
Why I am SO obsessed with Obsessive Compulsive Cosmetics Lip Tars!!!! (Swatches Included):

I always love stumbling upon great finds. For me the make-up world is like a giant gold mine, sometimes you have to dig up a lot of "fools gold" before you find the real Gold :) In this case, I am discussing an amazing lip product that actually does what it advertises: It lasts a long time!! It is a mixture between lip gloss and lip stick. It comes in various different forms including matte, glossy and metallic :) If you haven't already heard of this product keep reading!!! May I introduce to you the Lip Tar by Obsessive Compulsive Cosmetics a.k.a. OCC. These colors are so pigmented and they come in so many fabulous shades that truly make a statement!! Every time I wear my Lip Tars, I have so many people coming up to me asking me what lipstick am I wearing. I also love wearing them over some of my favorite lipsticks. I am going to share with you my ever-growing Lip Tar Collection and the swatches on my lips. Keep in mind I am medium to fair skin toned ;) OH and PS. no one is paying me to discuss this product, these are my honest reviews on everything :)
Above Left to Right: Pleasure Model, Femme, Hush, Mannequin, Digitalis, Ophelia 
(Swatches with flash)
Above: Wearing Mannequin with Digitalis Over it :)
Lip Liner: Rimmel Exaggerate 018

Wednesday, March 12, 2014

Wedding Day Tips from a New Bride (The Dos and The Don'ts):


Weddings are something that us women look forward to from the time we are little girls. Not only do we want to look absolutely stunning in person, but we also want to look AMAZING in our photographs.... so we can look back in 40 years on that monumental day and say WOW I LOOKED GREAT!!! Im going to share with you the "Dos and The Donts" on wedding day beauty and fashion. Also I am going to share with you the makeup that I wore on my wedding day :) 

 THE DONTS:
I am a huge believer in keeping things Classic, Timeless and Beautiful on your wedding day. I think almost any bride can pull off a soft, ethereal look. With that being said these are my biggest wedding donts: 
1. Red Lipstick 
Bright Red Lipstick on your wedding day can have many issues. First of all it can make a bride look too harsh and it can make you look a lot older (which is not what you want). Second if it is too bright of a red shade, people will not be noticing your natural beauty or your stunning dress....they will just be looking at your lips when they first see you. Third, red lips tend to bleed and feather around your lip line if your lips are not lined correctly, also there runs the risk of getting red lipstick on your pearly whites. Lastly, your groom may not like getting red lipstick all over him every time you kiss him on your wedding day (which you will be doing a lot of!!!) 

The Alternative:
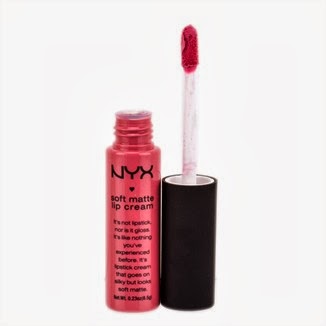
If you happen to be one of those women who love red lipstick and sees herself wearing it on her wedding day, then opt for a more subtle natural shade of red, or perhaps a dark rosy pink. Also a great tip is that you can take your favorite red shade and mix it with a little bit of white to lighten it. Here is a great natural rosy color:
NYX SOFT MATTE LIP CREAM - MILAN

2. No SPF!!!
Ladies I am all for SPF anything! I am a huge believer in staying out of the sun in order to preserve our youth and to prevent wrinkles. Normally I would advocate sunscreen, but not for your wedding day! Many brides do not know this tip, but photography and sunscreen do not mesh well. If you put on sunscreen underneath your foundation OR wear a foundation containing SPF anything, you may end up looking like a pale ghost in your pictures. Instead skip the sunscreen and head straight to a non-greasy moisturizer, then apply a foundation that contains no SPF. My FAVORITE foundation for brides is Make-up Forever HD foundation. It will make you look flawless in person and in photographs!
3. Don't Do an "up-do"
Many brides feel most traditional wearing their hair up on their wedding day...I personally feel it can sometimes look too severe on your wedding day and even sometimes a little too matronly (god forbid!) I think long flowing hair looks so soft and sexy, it also balances out your hips, especially if you are a bride with a more pear shaped physique, it looks best to wear your hair down :) This does not mean having to wear ALL of your hair down, this means you can do a half up, half down hair style, or all your hair to one side or a beautiful messy up do if you still want to do one. Here are some stunning examples of the perfect wedding day hair:
Or a Sexy Messy Up-do, Like seen here from the beautiful Brigitte Bardot :)

THE DOs:
1. Wear a Pink or Nude Lip Color: 

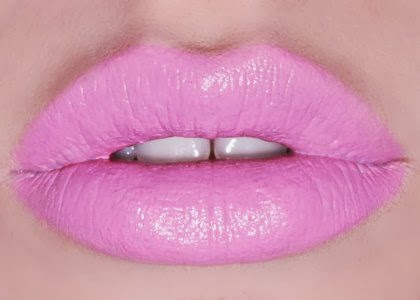
Nothing looks more sexy than a lighter lip in my opinion. Pink or Nude lips can make a lip look more pouty and sultry, and it gives the bride room to showcase her lovely eyes :) Also a wonderful trick is to put on a medium shade of pink or nude lipstick and than put a little white just in the center bottom and top lip, this gives the illusion of a fuller lip. Im obsessed with pink lipsticks and here is a list of my all time faves: 
YSL Rouge Volupte Lipstick #7 Lingerie Pink 
Lime Crime Great Pink Planet
NYX Stawberry Milk
MAC Snob

2. DO wear a Smokey Eye
I think a wedding is the perfect excuse to wear a smokey eye, in the old days, heavy eye makeup would have been considered a taboo for your wedding day, but i'm here to tell you it is indeed okay! For starters, a smokey eye can give you a very sexy, alluring and mysterious look. It can play up and enhance any eye color. Your groom will be melting into your mesmerizing eyes. If you're afraid to do a black smokey eye, than opt for a brown shade to enhance your eyes. Dont forget to always line your eyes with a black liquid liner, so it will last all day and look amazing in photos! 

3. Say Yes To Lashes!
False eyelashes may be intimidating to some of you but it can really enhance your natural eye shape and give you that flirty sexy look on your wedding day. I am not an advocate for super giant, super furry fake lashes but i think the perfect natural, but dramatic lashes are the Ardell Demi Wispies. Practice putting on lashes before your big day. Here are my Holy Grail Lashes: 

MY WEDDING DAY MAKEUP:

1. Moisturizer: Clinique Dramatically Different Moisturizing Gel
2. Primer: Laura Mercier Radiance Primer
3. Foundation: Makeup Forever HD N123
4. Concealer: Lancome Anti-cernes Waterproof concealer in Porcelaine 1
5. Contour/Bronzer: NYX Taupe blush
6. Highlighter under the eye: YSL Touche Eclat 1.5
7. Shimmer Highlighter: Physicians Formula highlighter in Pearl 
8. Urban Decay Perversion Liquid liner
9. Mac Carbon eyeshadow
10. Loreal Voluminous mascara
11. Ardell Demi Wispies (2 sets on each lash)
12. Rimmel Lip Liner 018
13. Lime Crime Great Pink Planet with YSL #7
14. Urban Decay All Nighter Setting Spray 

Thank You To All my Readers, if you have any questions please add a comment or email me at: Brittreed45@gmail.com :)